Monday 25 December 2017

Strawberry and White Chocolate Mousse Cake Recipe

May this festive season sparkle and shine, may all of your wishes and dreams come true, and may you feel this happiness all year round. Merry Christmas!

Eggless Mousse Recipe


It is like just yesterday we celebrated Christmas and in just a blink of an eye it’s another Christmas! Hope you all have finalised your Christmas menu and are all set to celebrate with your loved ones… If you are still confused with the menu you can go through my Christmas special here or I have created an album on my Facebook page that you can check out...
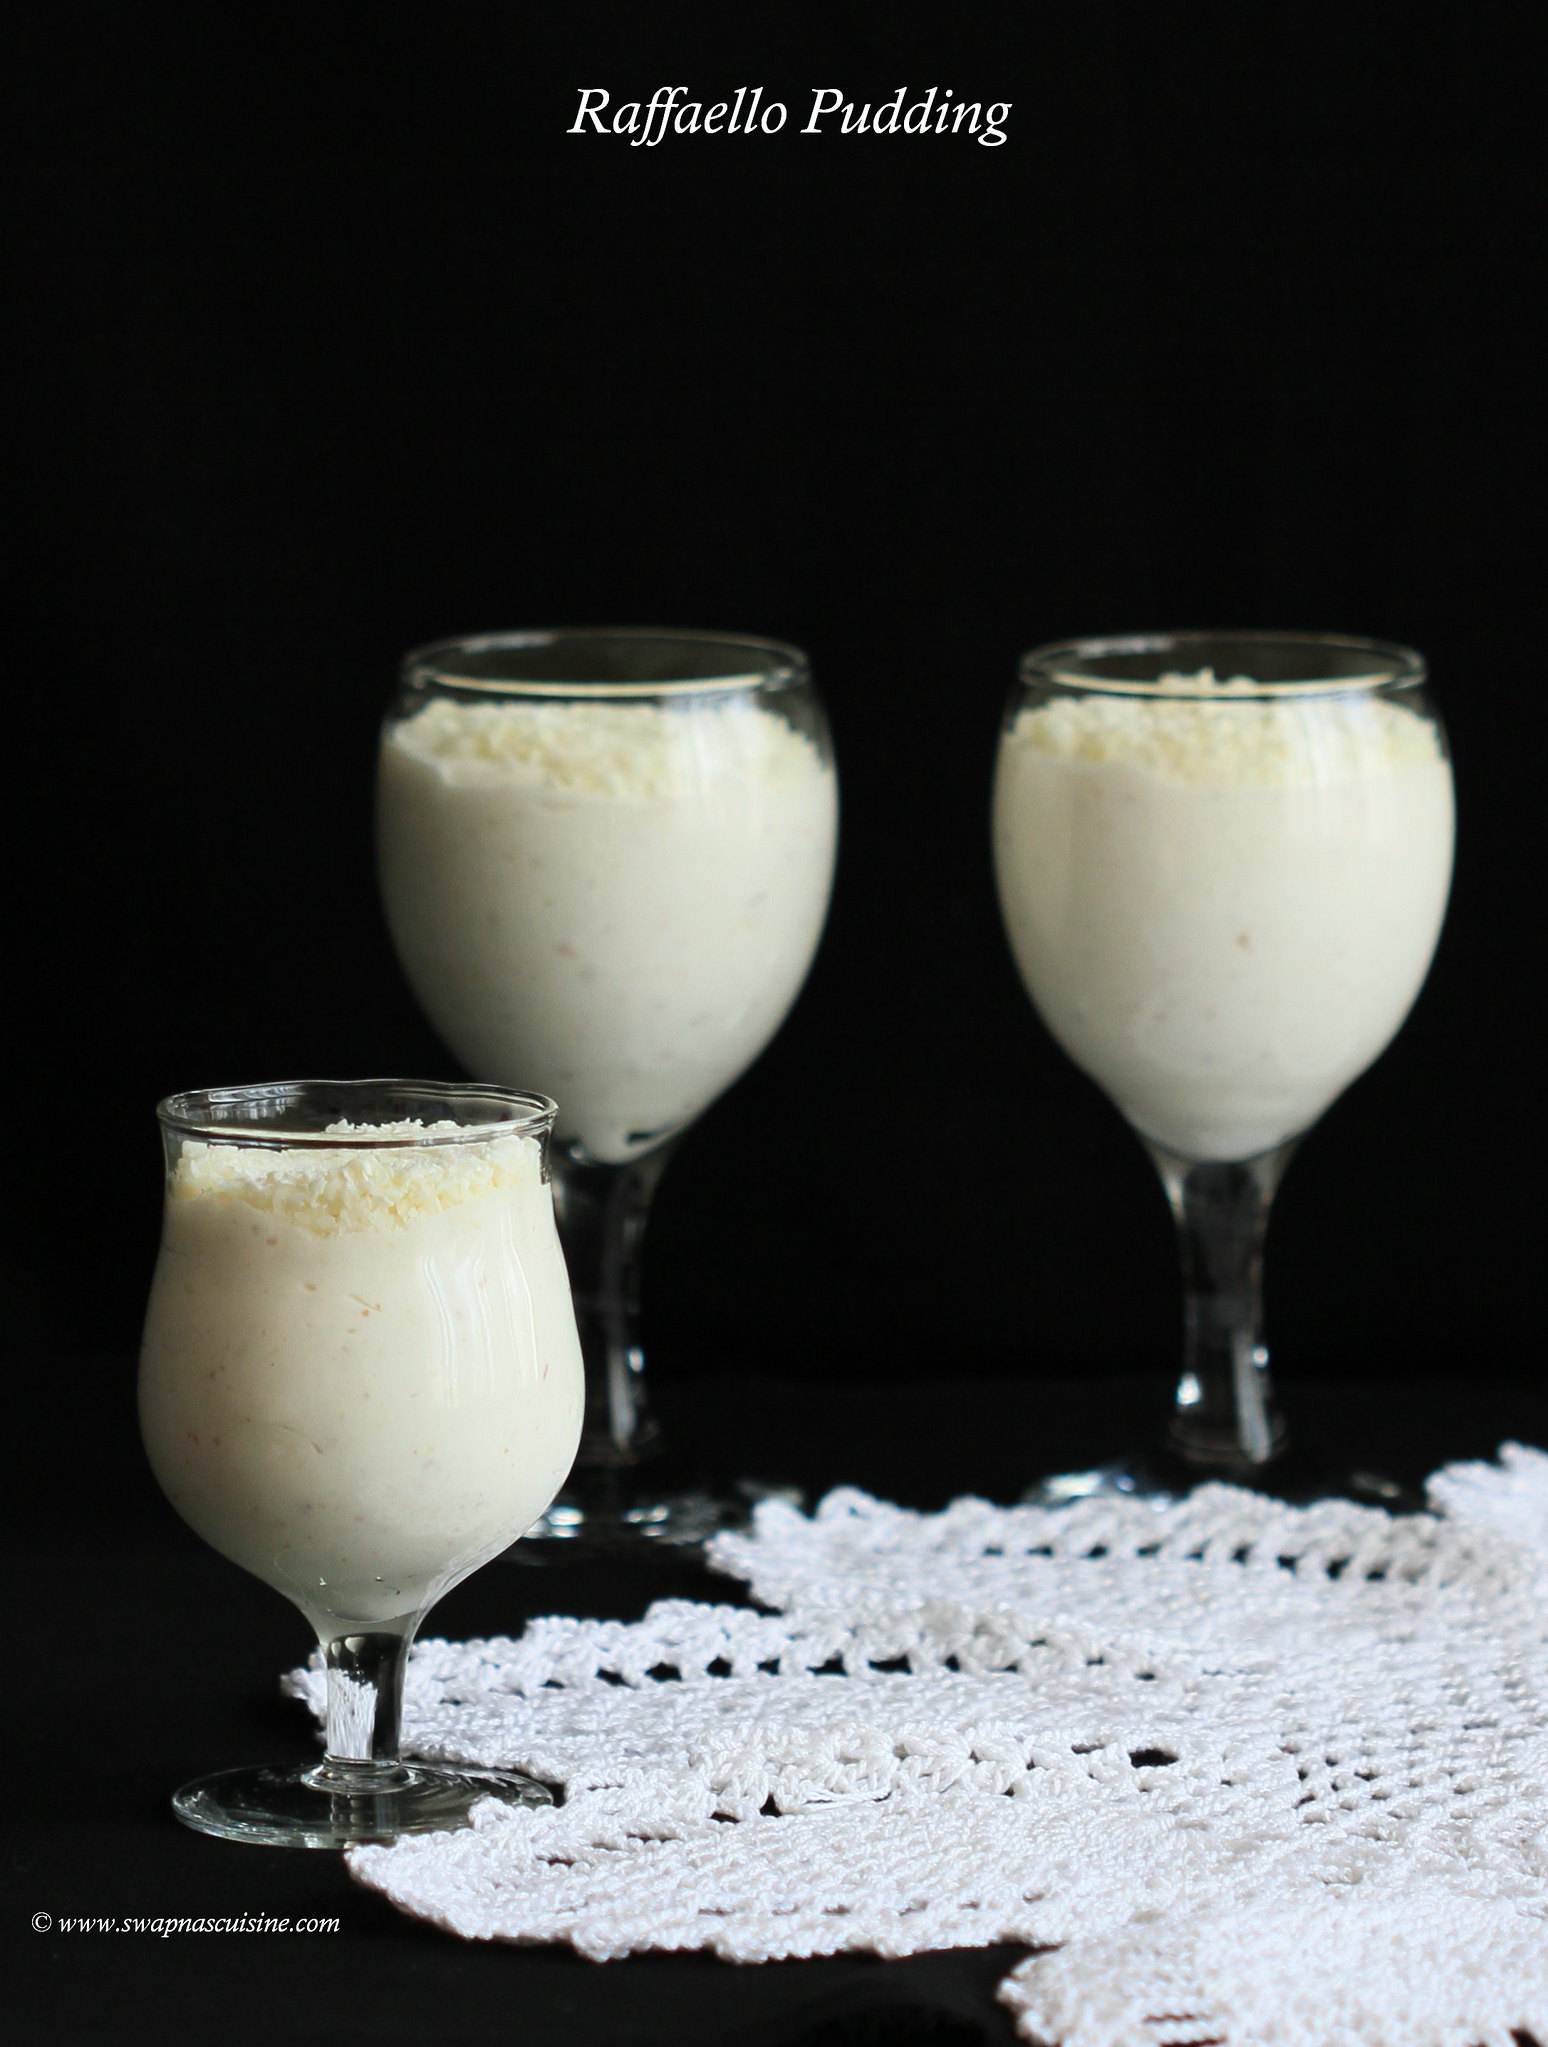
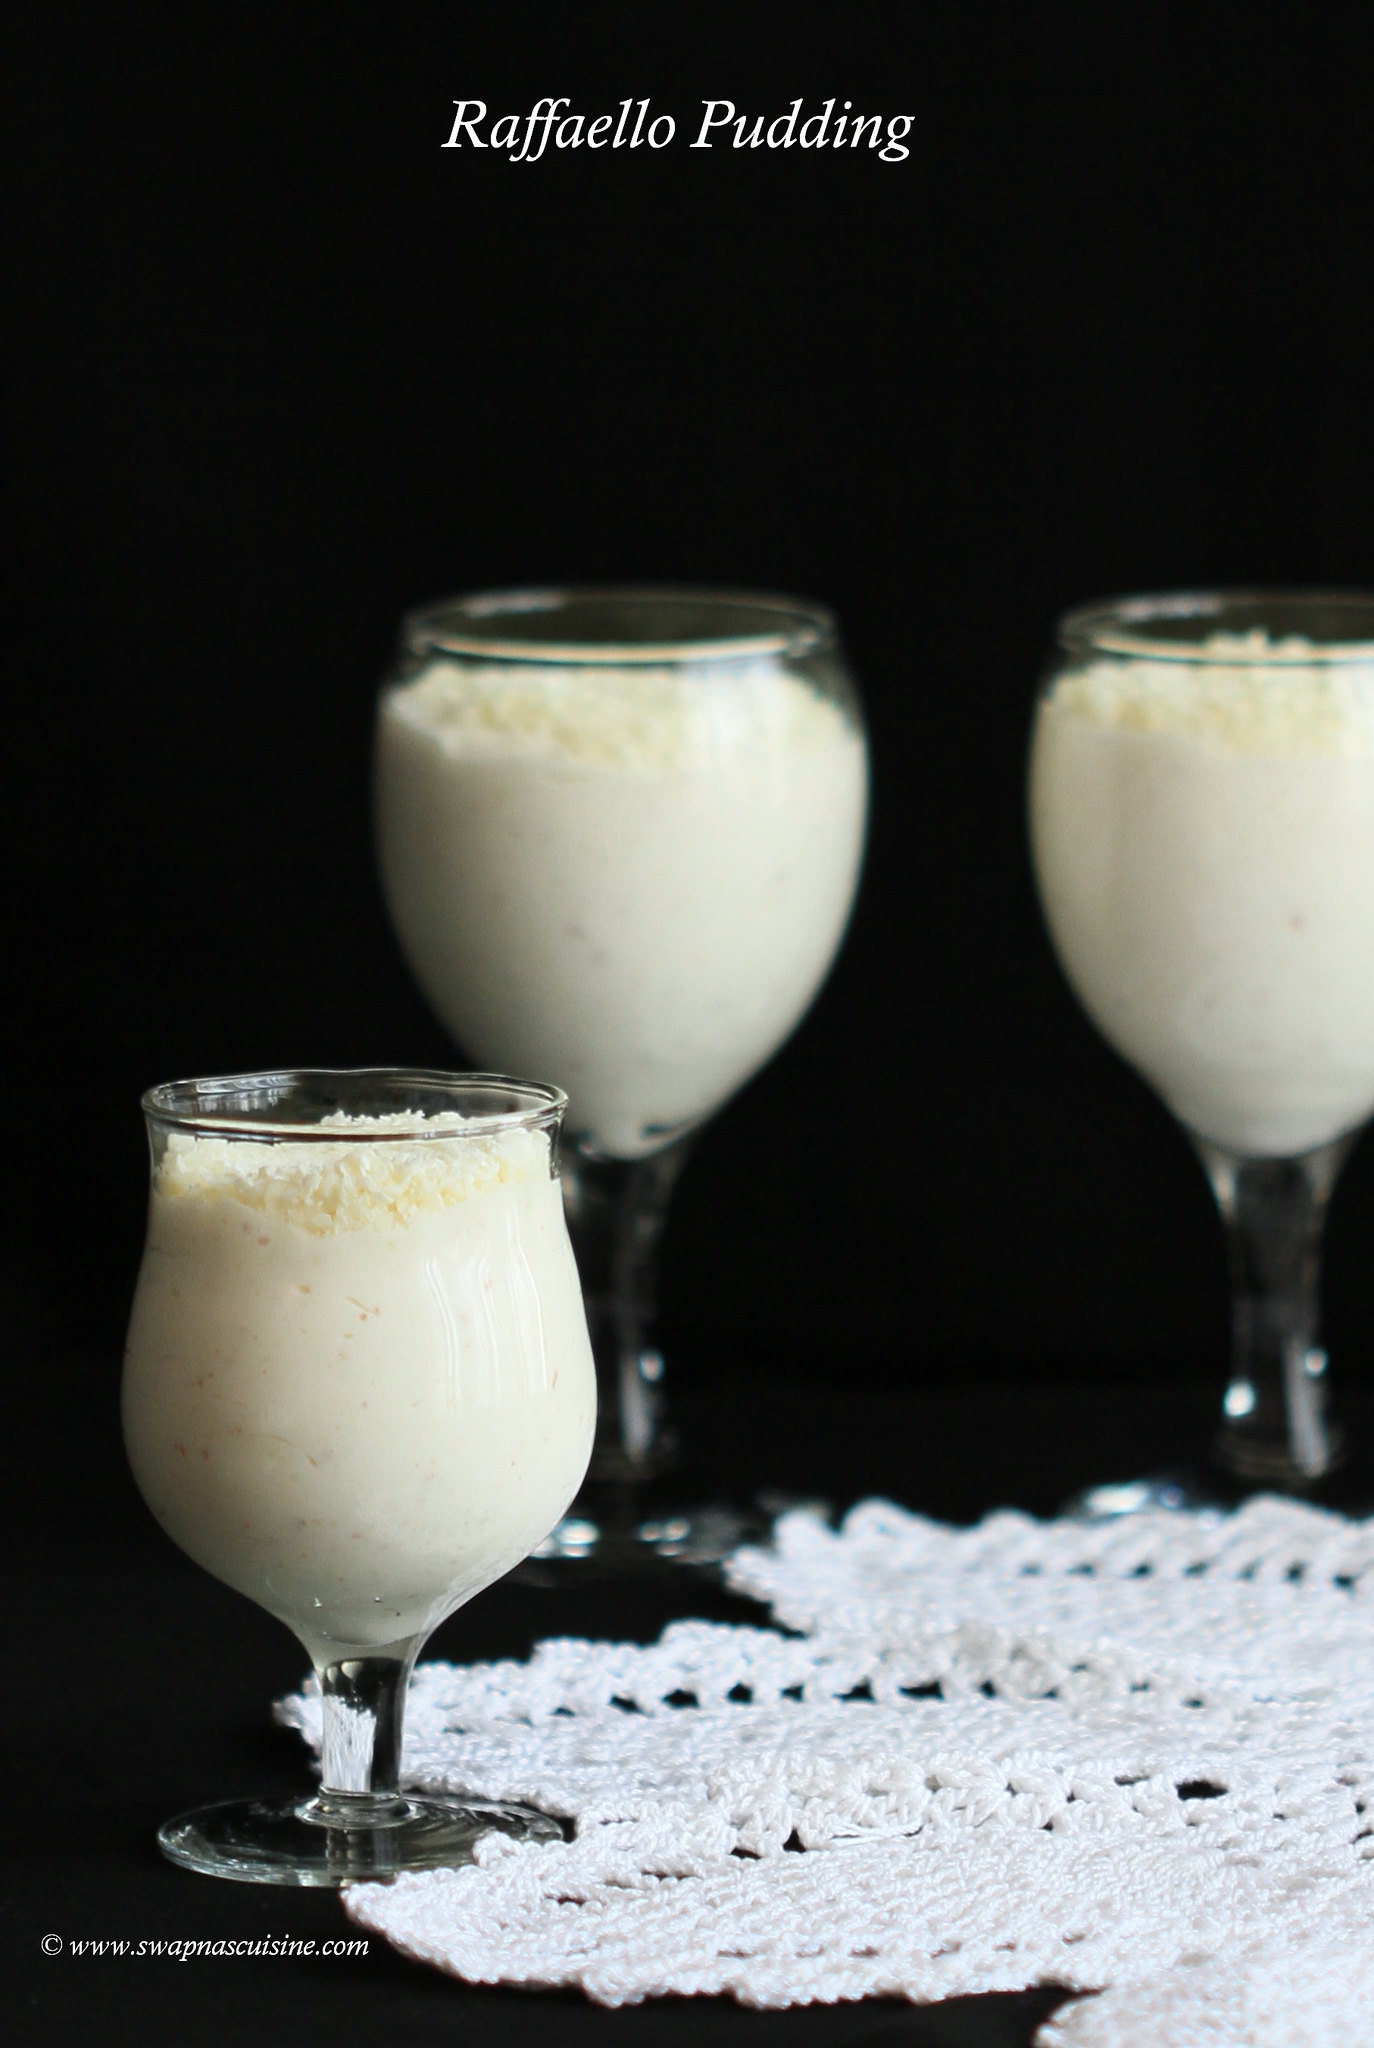

Strawberry and White Chocolate Mousse Cake is a very easy to make recipe. I made this first time for my husband’s birthday earlier this year. That time I set it in a cake tin and I also did mirror glazing on top of it. It was an awesome birthday cake for people who prefer something different from the usual.... I am a huge fan of making desserts in individual glasses, so the second time I prepared this, I served it in individual glasses like in the picture. I really loved the way it turned out! Do try this recipe, I am sure you will love this no bake eggless decadent dessert!

White Chocolate Mousse Cake Recipe


Strawberry and White Chocolate Mousse Cake
(Recipe from here)
Prep time
30 mins
Serves: 16
Ingredients:
For the Biscuit Layer:
Crushed Arrowroot / Digestives biscuits - 250gm
Butter - 100gm
For the White chocolate layer:
White Chocolate - 200gm
Cream - 150 ml
Gelatine Powder – 2 tsp
Water - 2 tbsp
For the Strawberry Mousse layer:
Strawberries - 300gm
Sugar - ¼ Cup / 50gm
Gelatine Powder - 2 tsp
Water – 2 tbsp
500ml Cream
Method:
  • Place the biscuits into a food processor and process until smooth. Melt the butter and pour over the crushed biscuits.
  • Mix until well combined and press into the base of a cake tin / or into small individual glasses. Place into the fridge to set.
  • Place the strawberries and sugar into a saucepan and heat over medium heat until the sugar has dissolved and the strawberries have softened. Add the gelatine powder and water and mix until dissolved.
  • Place into a blender and blend until smooth. Leave to cool.
  • Melt the white chocolate and cream together in a saucepan. Add the gelatine and water and mix until dissolved. Leave to cool.
  • Whip the cream and fold half into the white chocolate mixture and half into the strawberry mixture.
  • Spread the white chocolate over the set biscuits and place back into the fridge for 10-15 minutes until starting to set.
  • Pour over the strawberry mousse and place back into the fridge to set completely for 2-3 hours.


how to make Strawberry and White Chocolate Mousse Cake

Read More » Print Friendly and PDF

Tuesday 12 December 2017

Pineapple Wine Recipe

How to make Pineapple Wine

How are the Christmas preparations coming along? I hope at least some of you have tried some wine this year. If you are on the lookout for recipes for baking Christmas Cakes & Cookies you can search my older posts.  Today’s recipe for Pineapple Wine is one of the most requested recipes by my readers. The best part of this wine is that you can use every part of the pineapple to make the wine, the skin, the centre core and the flesh, there is no wastage at all. I must warn you that Pineapple wine is considered to be one of the strongest wines, so please be careful while consuming :D :D   


Recipe for Pineapple Wine

Pineapple Wine
Ingredients:
Pineapple - 2 kg (around 2 big pineapples)
Sugar -2 kg
Water - 4 ½ litres
Yeast - 1 tsp
Orange juice from 3 Oranges

Method:
  • Wash the pineapple, cut off the top and bottom of the pineapple and chop them into small pieces including the skin and the centre core.
  • Add sugar and water to the pineapple pieces and give it a nice boil for 5 minutes.
  • When the mixture is lukewarm add yeast and the orange juice from 3 oranges.
  • Mix everything well and transfer the mixture to a sterilized glass bottle / bharani, cover it and leave for 21 days stirring daily.
  • After 21 days, strain the mixture through a cheese / muslin cloth in to a clean dry bottle.
  • Keep this again for 21 days untouched. After 21 days strain the wine again, pour it in to clean dry bottles and use.  


Read More » Print Friendly and PDF

Monday 4 December 2017

Cinnamon Roll Fudge

Cinnamon Roll Fudge recipe

Christmas is around the corner and I am sure many of you have already started your Christmas preparations…. To ring in the festive spirit I thought of sharing this Cinnamon Roll Fudge recipe…. Cinnamon Roll Fudge has a smooth and creamy texture with the combination of cinnamon and white chocolate swirling around…. If you are looking for some easy to make Christmas gift ideas, this will be a perfect one for you…  Please do check these Fudge & Truffles recipes I have posted earlier for more ideas…. Wishing you all a December filled with Peace, Love & Happiness… Enjoy!  

How to make Cinnamon Roll Fudge


Cinnamon Roll Fudge
(Recipe from here)
Ingredients:
Evaporated Milk - 2/3 cup / 170 gm can (not sweetened condensed milk)
Granulated sugar - 1 1/3 cup
Vanilla Essence - 1 teaspoon
A pinch of salt
Mini Marshmallows - 1 1/2 cups
White chocolate chips - 1 1/2 cup
Cinnamon chips - 1 cup

Method:
  • Melt cinnamon chips in a heat safe bowl on top of a small pot of simmering water. Do not let the hot water touch the bowl. Take the bowl off when cinnamon chips are melted and set aside. (The melted cinnamon chips may have a thick consistency. But when it cools, it will become creamy.)
  • Put marshmallows and white chocolate in a large mixing bowl, set aside.
  • Bring milk, sugar, vanilla, and salt to boil over medium heat. Cook for 4 minutes, stir constantly. Remove from heat.
  • Pour over marshmallows and white chocolate. Stir until all combined and the chocolate chips and marshmallows are melted. (If marshmallows are not melted, you have to heat the mixture in low heat stirring continuously).
  • Pour 1/2 the fudge mixture into a lined 8” X 8” baking dish. Line the pan with parchment paper or aluminium foil, sprayed with cooking spray.
  • Spoon small dollops of 1/2 of the melted cinnamon chips onto the bottom layer of fudge mixture. Continue with the rest of the fudge mixture and finish off with the rest of the melted cinnamon. Glide a knife all the way through the fudge to make swirls.
  • Place in the refrigerator to set up for at least 2 hours or set overnight at room temperature before cutting into pieces.
  • Enjoy!

Cinnamon Fudge recipe

Read More » Print Friendly and PDF

Wednesday 11 October 2017

Rambutan Wine

Homemade Rambutan Wine

As usual I am back after a long hiatus ;) ;) If you are a regular reader you would know by now that if I intend to take a short break, it usually drags on for weeks :D
Since Christmas is around the corner, here is a Rambutan wine recipe for you to try. Rambutan is one of my favourite fruits and there are couple of trees in my father’s backyard. When Rambutan is in season, Appa freezes it and keeps it along with passion fruit pulp for me to take it to Kuwait J This is a sweet wine and if you prefer less sweeter wine you may only need to add 750 gms of sugar. Do try this if you get hold of Rambutans and let me know....

Rambutan Wine Recipe


Rambutan Wine
(Recipe adapted from Vanitha)
Ingredients:
Ripe Rambutan - 100 nos
Sugar - 750 gm to 1 kg
Water – 3 litre
Yeast – ½ tsp
Cloves / Grambu – 8 nos
Cinnamon stick / Karuva patta – 1 x 2” piece
Egg white – 1

Method:
  • Using a small paring knife, peel away the outer shell of rambutans and put the flesh with seeds in a big clean sterilized bharani / bottle.
  • Boil sugar & water and add boiled water to the Rambutan and mix well.
  • When the mixture becomes lukewarm add yeast, cloves and cinnamon stick and mix well.
  • Beat an egg white well and add to the above cooled rambutan mix, stir well to combine everything.
  • Tie the bottle with a clean cloth or close with lid little loose.  
  • Stir this mixture every day for 20 days.
  • After 20 days, strain the mixture through a cheese/ muslin cloth in to a clean dry bottle.
  • Keep this again for 7 days untouched. After 7 days strain the wine again, pour it in to clean dry bottles and use. 

Read More » Print Friendly and PDF

Wednesday 17 May 2017

Raffaello Pudding


Raffaello Pudding is a wonderful combination of coconut, cream, condensed milk and white chocolate which resembles the taste of the Ferrero Rocher Raffaello Truffles. This is a very rich pudding with a beautiful texture and flavour. No cooking or baking is involved in the making of this pudding, you just need to whip everything and refrigerate to set. Make sure to use desiccated coconut, do not use fresh coconut to make this pudding. I only made half the quantity of the pudding and set in individual serving glasses. If you are setting the pudding as individual servings, as in the picture, you only need to add half table spoon of gelatine.


Raffaello Pudding
(Recipe from Lekshmi Nair)
(20-25 servings)
Ingredients:
Coconut Milk Powder – 200 gm
Fresh Cream – 400 ml (1 ¾ cups)
Whipping Cream – 250 ml (1 cup)
Condensed Milk – 1 tin
Desiccated Coconut – 1 cup
Gelatine – 1 tbsp. (use only half tbsp if setting in individual glasses)
Cold Water – ¼ cup
White Chocolate, grated – 1 ½ cups
Almonds / Badam – ½ cup, grated or finely chopped

Method:
  • Sprinkle gelatine over cold water and let stand for 5-10 minutes.
  • In a mixing bowl whip together coconut milk powder, condensed milk, whipping cream and fresh cream until soft peaks are formed.
  • Melt gelatine, either in microwave for 10 seconds or heat gently stirring well.
  • Pour the melted gelatine to the above pudding mix and whip well until everything is blended.
  • In a small bowl mix together desiccated coconut, grated almonds and 1 cup of grated white chocolate and combine well. Add this mix to the whipped pudding mixture and beat again until everything combined well.
  • Transfer the mix to a pudding dish or individual serving bowls. Decorate with remaining grated white chocolate and allow to set in fridge for 5-6 hours.
  • Serve chilled.


Read More » Print Friendly and PDF

Monday 8 May 2017

Paneer Biriyani

Cottage Cheese Biriyani Recipe

If you are on lent and craving to eat some biriyani, or if you have some vegetarian guests at home or if you want to serve something different other than the usual chicken or muttonbiriyani, this Paneer Biriyani is a good option! This came out really good when I recently made it for some guests and they all enjoyed it. Got this recipe from an old Vanitha magazine. This is a great option if you are lazy to make an elaborate weekend lunch / dinner. It is easy to make and can be served with biriyani salad, mint chutney, pickle and pappad. Do try and let me know how it turns out.

Paneer Biriyani
Ingredients
For the Rice:
Basmati Rice - 2 cups
Boiling water- 4 cups
Cinnamon sticks -2 x 1” piece
Cloves - 2
Cardamom - 2
Shahi Jeera - ½ tsp
Salt - to taste
Ghee - 2 tbsp
For Paneer Masala
Paneer - 300 gms, cut into cubes
Onion - 3 medium, finely sliced
Ginger Paste - 1 tbsp
Garlic paste - 1 tbsp
Tomato - 2 medium, sliced
Chilli powder - 2 tsp
Coriander powder - 2½ tsp
Turmeric powder - ½ tsp
Fennel seeds / Perumjeerakam - ½ tsp
Cinnamon - 1 small piece
Cloves - 3
Cardamom - 3
Yogurt - ¼ cup
Cashew nuts - 8 nos, grind to a fine paste
Coriander leaves - ¼ cup, chopped
Mint leaves - 2 tbsp, chopped
Salt
Ghee 2-3 tbsp
For Garnishing
Onion - 1medium, finely sliced & fried
Fried Cashew nuts - ¼ cup
Fried raisins - ¼ cup
Ghee
Coriander & Mint leaves

Method:
Preparing the Rice: 
  • Wash rice and drain out the excess water. 
  • In a non-stick pan heat 2 tbsp ghee and add shahi jeera, cinnamon, cloves and cardamom and sauté for few seconds and add the rice. Stir continuously on high heat for 2-3 minutes. Add boiling water and salt, stir well and cook covered on low heat until the water has been absorbed. Gently stir the rice with a fork and keep aside.
Preparing the Paneer Masala:
  • Grind together chilli powder, coriander powder, turmeric powder, fennel seeds, cinnamon, cardamom and cloves with 1 or 2 tbsp water to a fine paste. Keep it aside.
  • Heat ghee in a pan and add sliced onions and sauté till the onions become golden brown in colour.
  • Add ginger and garlic paste. Cook for 4 -5 mins.
  • Add the ground masala paste to this and cook till the raw smell goes, around five minutes in medium heat.
  • Add sliced tomatoes and cook till oil separates.
  • Add cashew nut paste and yogurt and mix well. Add paneer cubes to this, cover and cook for 8-10 minutes. Add half of coriander leaves and mint leaves and remove from fire.

Assemble the Biriyani:
  • Grease an ovenproof baking dish with some ghee.  Divide the rice into three portions. Spread one portion to the bottom of the dish. Cover the rice with half of the cooked paneer. Sprinkle some of the remaining coriander leaves and mint leaves, and a portion of fried cashew nuts and raisins. Spread another layer of rice on top, and then cover with the rest of the chicken, mint leaves and coriander leaves. Finally top the chicken with the last portion of rice. Drizzle some saffron soaked in milk and ghee on the rice.
  • Pre-heat oven to 180˚C and bake biriyani for 15 - 20 minutes or until heated thoroughly.
  • Garnish biriyani with some golden fried onions, cashews, raisins, mint and coriander leaves. Serve with Biriyani Salad (Onion and yogurtsalad), Mint chutney, Lime pickle, Dates pickle and pappad.


Read More » Print Friendly and PDF

Tuesday 25 April 2017

No-Churn Coffee Ice Cream

Mocha Ice Cream


Today’s post is a rich and creamy coffee ice cream. No cooking is involved to make this and is extremely easy to prepare without an ice cream maker. This goes really well with the Triple Chocolate Brownie I had posted some time back. If you are a coffee lover, I am sure you will love this!


Coffeel Ice Cream Recipe

No-Churn Coffee Ice Cream
(Recipe from here)
Ingredients:
Very cold heavy whipping cream - 2 cups
Sweetened condensed milk - 1 (14 oz) can
Instant coffee - 5 tsp + 2 ½ tsp warm water
Vanilla essence - 2 tsp
Method:

  • In a large bowl, whip heavy whipping cream until stiff peaks form.
  • Dissolve instant coffee granules in warm water and stir into heavy cream mixture along with sweetened condensed milk and vanilla extract.
  • Pour ice cream mixture into an airtight container and freeze for 5-6 hours or overnight.
Three Ingredient Ice Cream Recipe

Read More » Print Friendly and PDF

Wednesday 8 March 2017

Mathanga Erissery / Pumpkin Erissery

Pumpkin Erissery

Erissery is an essential part of Kerala Sadya or Onam Sadya. Erissery can be cooked with different ingredients like mathanga, chena, Kaya or it can be cooked with a combination of vanpayar too. The cooking method will be the same in all. Here is how I make Mathanga Erissery....

How to make Pumpkin Erissery


Mathanga Erissery / Pumpkin Erissery
Ingredients:
Mathanga / Pumpkin - 2 cups, diced
Green chilly - 1, chopped
Salt to taste
Grind Together:
Grated coconut - ½ cup
Turmeric powder - ¼ tsp
Green chillies - 3
Cumin seeds - ½ tsp
Garlic - 1 clove
For Tempering:
Coconut Oil - 1 ½ tbsp
Mustard seeds - ½ tsp
Dried red chillies - 2, torn into 2 pieces 
Curry leaves - 2 strands
Small onion / Chumannulli - 3-4, sliced
Ginger - ½ tsp, chopped
Grated coconut - 1 tablespoon 

Method:
  • Cook mathanga / pumpkin with chopped green chilly, salt and enough water. Mash pumpkin well with the back of a spoon.
  • Grind coconut and all the other ingredients to a fine paste. Add ground paste to the cooked Pumpkin, Let it cook on low flame for 5-8 mins. Remove from heat.
  • Heat oil in another pan and splutter mustard seeds. Add small onion, red chillies, curry leaves, ginger and coconut and fry till brown. 
  • Pour this over the erissery, mix well and serve hot with rice. 
Read More » Print Friendly and PDF

Monday 13 February 2017

Flourless Chocolate Cake with Coffee Mousse

Flourless Chocolate Cake with Coffee Mousse recipe


Valentine’s Day is just around the corner, I thought my new post should be a chocolate dessert. Now a days short cooking videos are very popular in social media and people tend to share a lot of those videos. Although I love to watch such videos, I am not at all comfortable making video recipes :) :) …. Today’s recipe is one such shared recipe on Facebook. I immediately loved the recipe as it has my favourite chocolate and coffee in it. The chocolate cake is flourless and it is great for those who have gluten intolerance. The rich and fudgy chocolate base is topped with aromatic, soft and silky coffee mousse. It is absolutely heavenly and decadent dessert to make for your loved one!

Flourless Chocolate Cake Recipe


gluten intolerance desserts


Flourless Chocolate Cake with Coffee Mousse
(Recipe from here)
Makes about 8-10 servings
Ingredients:

Flourless Chocolate Cake
Butter - ½ cup (110g)
Semisweet chocolate - 150g (5 oz )
Eggs - 3, separated
Sugar - ½ (100g)
Unsweetened cocoa powder - 1 tbsp 
Salt - a pinch

Coffee Mousse
Egg yolks - 2
Sugar - ½ cup (100g)
Corn flour / corn starch - 1 ½ tbsp 
Warm milk - 2/3 cup (160ml)
Vanilla essence - ½ tsp 
Instant coffee - 1 tbsp 
Gelatine powder - ½  tbsp 
Cold water - 2 tbsp 
Whipping cream - 1 cup (240g), chilled

Method:

Flourless Chocolate Cake
  • Grease and line a 8-inch (20 cm) spring form pan (with a removable base) with parchment paper. Separate egg yolks from whites. Preheat oven to 180°C (350°F).
  • Melt chocolate and butter over a bain-marie (double boil) until smooth. Let it cool slightly. Add yolks one at a time and stir well. Stir in cocoa powder and salt. 
  • Whip egg whites until foamy using a mixer. Gradually add sugar and whip until stiff peaks form.  Gently fold the whipped whites into chocolate mixture.
  • Pour batter into prepared pan and bake for 25 minutes. Let it cool completely in the pan over a cooling rack.
Prepare the coffee mousse:
  • Stir egg yolks with sugar until creamy and pale yellow coloured. Stir in corn starch. Gradually whisk in the warm milk until completely combined.
  • Place the yolks mixture into a small saucepan and cook over low heat while stirring until boils and thickens.
  • Remove from heat and stir in vanilla essence and instant coffee. Let it cool.
  • Dissolve gelatine in 2 tbsp cold water and let it swell for about 5 to 10 minutes. Place over low heat just until the gelatine dissolves and then pour it over coffee mixture.
  • Whip the cold whipping cream until stiff peaks form. Gradually incorporate into coffee mixture.
  • Spread the coffee mousse over the chocolate cake in the pan, using an offset spatula.
  • Cover and refrigerate for about 4 hrs or overnight to set before serving.
  • Run a warm knife around the edges of the cake to remove the sides of the pan.
  • Dust the top of the cake with cocoa powder.
  • Using a warm knife cut the cake into slices and serve.
Layered desserts
Read More » Print Friendly and PDF

Thursday 2 February 2017

Grapefruit Wine Recipe

How to make Grapefruit Wine at home

As usual a short break from blogging become a little too long, as is the case every time. I thought therefore that the first post of the year should be a wine recipe to compensate for the long-time neglected blog :) :) ... Grapefruit is a popular citrus fruit that is a terrific source of vitamins, fibre and other nutrients. It has a tart and tangy taste with an underlying sweetness. Grapefruit makes a delightful wine with a sweet and tart taste. Even though the wine will be ready in 21 days, if you allow it to age longer, you will get a mellow wine!  

Kerala Grapefruit Wine Recipe


Grapefruit Wine
Ingredients:
Grapefruits - 6 nos
Sugar - 1 ½ kg
Water - 4 liters
Yeast - ½ tsp

Method:
  • Wash grapefruits and wipe it with a kitchen tissue or clean cloth.
  • With a citrus peeler or vegetable peeler thinly peel the grapefruit zest from 3 grapefruits without the white part. Extract the juice from the all grapefruits and keep aside.
  • Boil sugar, water and grapefruit zest in a big vessel.
  • When the mixture begins to boil, add grapefruit juice and bring it to a nice boil and turn off the flame.
  • When the mixture becomes lukewarm, add yeast and transfer the mixture to a sterilized glass bottle / bharani, cover it and leave for 14 days stirring daily.
  • After 14 days, strain the mixture through a cheese/muslin cloth in to a clean dry bottle.
  • Keep this again for 7 days untouched. After 7 days strain the wine again, pour it in to clean dry bottles and use. 


Read More » Print Friendly and PDF
Related Posts Plugin for WordPress, Blogger...